
KETO SOURDOUGH DISCARD BAGELS

The Keto Baking Mechanic™ — Recipes
Keto Sourdough Bagels
Where We Create, Tweak and Enhance
Keto and Low Carb Breads and Baked Goods
🍪 Authentic Chew, 2.34g Net Carbs, No Cardboard Taste
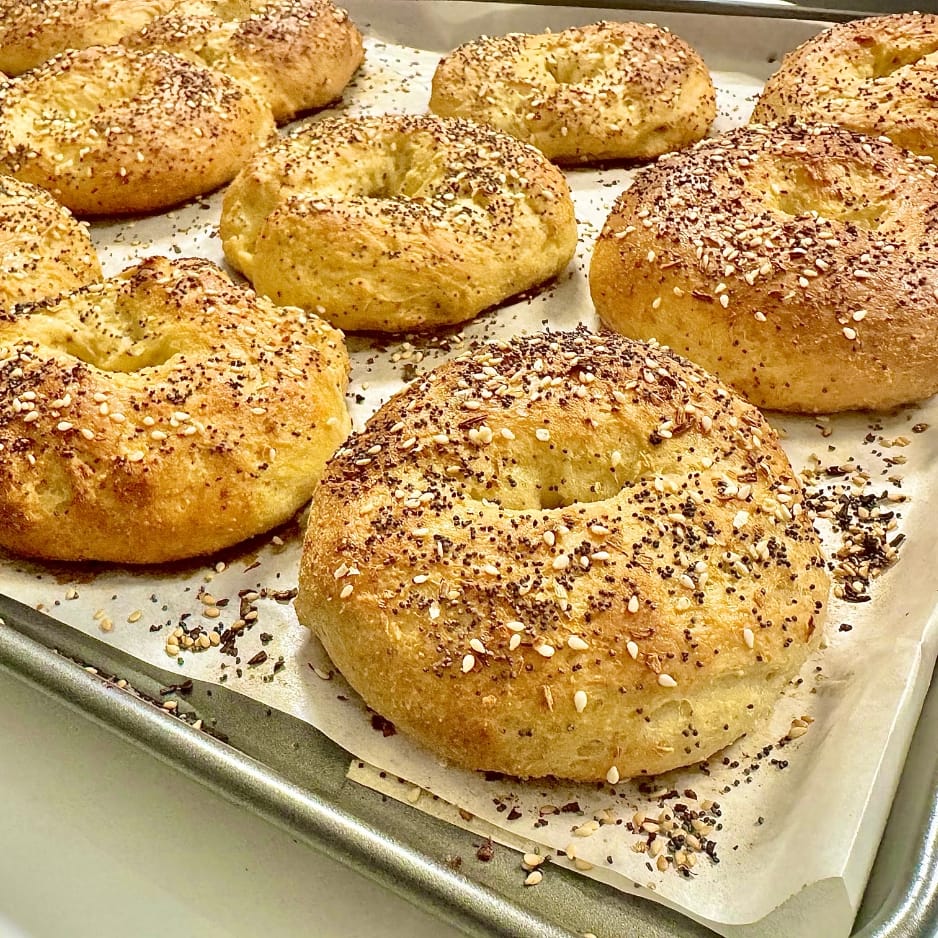
Keto bagels don’t have to taste like cardboard. This bagel recipe incorporates your Biome Boss™ living sourdough discard with a flexible keto milk bread dough base to create that authentic chewy texture you’ve been craving. The first bite took me straight back to New York delis — minus the blood sugar spike.
A Note on “Keto” Labelling
This recipe is labelled keto because it’s designed to reduce blood sugar impact through ingredient choices and traditional fermentation methods — not because it requires strict dieting. Many people looking for healthier recipes, improved digestion, or more stable energy enjoy these recipes successfully, even if they don’t follow a ketogenic lifestyle.
Traditional bagels pack 50+ grams of carbs into each ring of refined flour. This keto sourdough bagel recipe delivers the same satisfying chew with just 2.34g net carbs per bagel. The vital wheat gluten creates that signature bounce, while Biome Boss™ living starter adds authentic sourdough tang and gut-friendly benefits.
These aren’t just low-carb bread substitutes. They’re legitimate keto sourdough bagels that toast beautifully, hold up to schmears, and actually taste like the real thing.
🎥 Follow The Keto Baking Mechanic on YouTube for more flexible keto recipes: @theketobakingmechanic
https://sinlesssourdough.com/shop/
The Appeal
Why This Recipe Works
- Ultra low net carbs — only 2.34g per bagel
- Mega protein — 12.38g from vital wheat gluten and eggs
- Authentic texture — milk bread base creates real bagel chew
- Sourdough benefits — gut-friendly fermentation with discard
- Freezer friendly — batch bake and freeze for up to 3 months
- Beginner approved — no special skills required
Perfect for flexible keto breakfast enthusiasts, sourdough bakers with extra discard, and anyone who thought bagels were forever off the menu.
The Difference
What Makes These Bagels Different?
This recipe uses a keto milk bread dough technique combined with vital wheat gluten — the same protein that gives traditional bagels their chew. The result? A texture so close to conventional bagels that my non-keto husband couldn’t tell the difference.
The sourdough starter discard adds three game-changing benefits: authentic flavour profile, improved digestibility through fermentation, and gut-friendly prebiotic compounds.
Key Differences
- Real bagel texture vs. rubbery cheese-based versions
- High protein structure vs. crumbly substitutes
- Freezes beautifully vs. texture breakdown
The Science
Why Does This Recipe Work?
- Mega Protein: 12.38g from vital wheat gluten and eggs
- Ultra Low Net Carbs: Only 2.34g per bagel (vs. 50g+ traditional)
- Simple Ingredients: Available at most grocery stores
- Meal Prep Friendly: Freezes for up to 3 months without texture loss
- Authentic Chew: Vital wheat gluten creates real bagel texture
- Gut-Friendly: Sourdough fermentation may support digestive health
- Blood Sugar Stable: Low glycemic response supports steadier energy
- Versatile: Works with sweet or savoury toppings
Why It’s Valuable
Qualities of the Main Ingredients
Vital Wheat Gluten
- High Protein Content: Delivers 75–80% pure protein by weight, which may support muscle maintenance and satiety
- Low Net Carbs: Contains minimal digestible carbohydrates, making it well suited for flexible keto baking
- Texture Creation: Provides the elastic, chewy structure that makes these bagels taste authentic
Sourdough Starter (Biome Boss™)
- Prebiotic Compounds: Contains compounds that may support beneficial gut bacteria and digestive health
- Enhanced Bioavailability: Fermentation may help reduce phytic acid, potentially improving mineral absorption
- Lower Glycemic Response: The fermentation process may contribute to more stable blood sugar levels
Psyllium Husk
- Soluble Fibre: Provides bulk and structure while supporting digestive regularity
- Moisture Retention: Creates a gel that keeps bagels soft and prevents crumbling
- Satiety Support: Expands in the stomach, which may help you feel fuller for longer on fewer carbs
Why this combination works: the vital wheat gluten provides structure, psyllium husk adds moisture and fibre, and sourdough starter contributes flavour and potential digestive benefits. Together, they create bagels with authentic texture, steadier energy release, and lasting fullness — without spiking blood sugar.
What You’ll Need
Ingredients
Wet Ingredients
- 1 to 1½ cups Fairlife skim or 3% milk (480 mL) — creates milk bread texture (or use almond/coconut milk); always start with 1 cup and add more if needed — the amount required depends on the moisture of your discard
- 1 tablespoon instant yeast (10–11g) — provides rise and authentic bread flavour
- 1 teaspoon sugar (4g) — feeds the yeast (mostly consumed during fermentation)
- 3 large eggs — adds structure and protein
- ¼ cup cream cheese, softened (60g) — contributes richness and tenderness
- 1 cup Biome Boss™ living starter (240g) — delivers sourdough tang and gut benefits
- ¼ cup unsalted butter, softened (57g) — creates tender crumb and golden crust
Dry Ingredients
- 2 cups + 2 tablespoons vital wheat gluten (250g) — the protein that creates authentic chew
- 1 cup almond flour + 2 tablespoons coconut flour, sifted (110g + 16g) — adds moisture and nutty flavour
- 3 tablespoons whole psyllium husks — binds ingredients and adds fibre
- 1 tablespoon double-acting baking powder (12g) — provides extra lift
- 1 teaspoon healthy salt (6g) — enhances all flavours
Egg Wash
- 1 egg yolk + 2 tablespoons Fairlife milk (30 mL) — creates a golden, glossy finish
Can You Substitute Ingredients?
- Protein powder options: No — vital wheat gluten is essential for texture and cannot be substituted with protein powder
- Flour alternatives: Partial — you can replace almond flour with sunflower seed flour (same amount) but keep coconut flour as-is
- Oil/fat substitutions: Yes — replace butter with coconut oil or ghee (same measurement)
- Milk alternatives: Yes — use unsweetened almond milk or coconut milk (carb count will decrease slightly)
What You’ll Need
Equipment
- Stand mixer with beater attachment — essential for proper gluten development (hand mixing won’t achieve the same texture)
- Kitchen scale — precision matters for consistent results, though optional
- Large mixing bowl — allows dough to expand during autolyse rest
- Clean tea towel — covers dough during resting phases
- Baking sheets (2) — line with parchment for easy cleanup
- Parchment paper — prevents sticking and makes transfer simple
- Pastry brush — applies egg wash for golden finish
- Instant-read thermometer — ensures bagels reach proper internal temperature (190–200°F)
- Wire cooling rack — allows air circulation to prevent soggy bottoms
- Bench scraper (optional) — makes dividing dough easier and cleaner
Let’s Bake
How Do You Make Perfect Keto Bagels?
Phase 1: Activate Yeast & Combine Wet Ingredients
- Warm Fairlife milk to 100–110°F (about 30 seconds in microwave)
- Pour into stand mixer bowl, add yeast and sugar, stir briefly to dissolve
- Let sit for 2–3 minutes until mixture becomes foamy (this confirms yeast is active)
- Add 3 eggs and mix lightly on low speed
- Add softened cream cheese, Biome Boss™ living starter, and butter
- Mix on low for 10–15 seconds just until loosely combined (don’t overmix)
Pro tip: Room temperature ingredients combine more smoothly than cold ones.
Phase 2: Mix Dough & Autolyse Rest
- Sift almond flour and coconut flour together to remove lumps
- Add vital wheat gluten, sifted flour mixture, psyllium husks, baking powder, and salt on top of the wet ingredients
- Mix on low speed with beater attachment for about 2 minutes until a shaggy dough forms
- Cover bowl with tea towel and rest exactly 30 minutes at room temperature
Common mistake: Skipping the autolyse rest — this step allows vital wheat gluten to tighten and psyllium to form its gel structure.
Phase 3: Knead & Adjust Consistency
- Knead on medium-low speed for about 5 minutes until dough becomes smoother
- Assess texture: if too wet, add 1–2 tablespoons psyllium husks and refrigerate 15 minutes to stiffen; if too dry, add 1 tablespoon milk at a time
- Continue kneading for about 8 minutes until dough is smooth, elastic, and slightly tacky (not sticky)
- Perform the windowpane test: stretch a small piece of dough — it should form a thin, translucent membrane without tearing
Here’s where most people make their first mistake: over-kneading creates tough bagels. Stop when dough passes the windowpane test.
Phase 4: Shape Bagels
- Divide dough into 2 equal portions (use kitchen scale for precision)
- Roll each portion into a tight ball by tucking edges underneath
- Divide each ball into 6 portions
- Stretch and fold each piece at least 6 times to create surface tension
- Put your thumb through the centre of each ball to make a hole
- Shape into a bagel ring by gently stretching the hole to 1½–2 inches diameter
- Place on parchment-lined baking sheets
This is the game-changer: proper stretching and folding creates that smooth, professional-looking top.
Phase 5: Proof, Glaze & Bake
- Proof bagels for 60–80 minutes until visibly expanded (they won’t double in size like wheat bagels)
- Preheat oven to 350°F (180°C) during the final 15 minutes of proofing
- Brush tops with egg wash for golden sheen
- Sprinkle with favourite seasonings (everything seasoning, sesame seeds, sea salt)
- Bake 25–30 minutes until golden and internal temperature reads 190–200°F (90–94°C); tent with foil if browning too quickly after 20 minutes
- Turn off oven and leave bagels inside for 5 to 10 minutes to prevent deflating
- Remove bagels from oven; cool on the baking sheet for 5 to 10 minutes, then transfer to a wire rack
Pay close attention to this next part: don’t slice until completely cool (2 hours) — cutting warm bagels creates a gummy texture.
Troubleshooting
Common Mistakes
Problem: Bagels spread flat instead of holding shape
Solution: Ensure dough passes the windowpane test before shaping. Add extra psyllium husk if too wet.
Why it happens: Under-kneaded gluten can’t hold structure during baking.
Problem: Dense, heavy texture
Solution: Check yeast freshness — it should foam when combined with warm milk and sugar. Don’t skip the autolyse rest.
Why it happens: Inactive yeast or a skipped resting phase prevents proper rise.
Problem: Gummy, wet interior
Solution: Bake until internal temperature reaches 190–200°F and cool completely (2 hours) before slicing.
Why it happens: Underbaking or cutting too soon traps moisture inside.
Problem: Dry, crumbly bagels
Solution: Don’t overbake — remove from oven when internal temperature hits 200°F. Store in an airtight container.
Why it happens: Extended baking time evaporates too much moisture from low-carb ingredients.
Problem: Bagels collapse after baking
Solution: Turn off the oven and leave bagels inside for 5 minutes before removing.
Why it happens: Sudden temperature change causes structure to collapse before it fully sets.
Make It Your Own
Variations
Everything Bagels
Add 2 tablespoons each of sesame seeds, poppy seeds, dried minced onion, and dried minced garlic. Mix 1 tablespoon into the dough, sprinkle remaining on top with egg wash. Classic deli flavour — perfect with cream cheese or smoked salmon.
Cinnamon Raisin Bagels
Add 2 teaspoons cinnamon + ¼ cup sugar-free dried cranberries to dough; increase powdered sweetener to ⅓ cup. Sweet, warming breakfast option — delicious toasted with butter or almond butter.
Jalapeño Cheddar Bagels
Mix in ½ cup shredded cheddar + 2 tablespoons diced pickled jalapeños; sprinkle extra cheese on top before baking. Spicy, savoury kick — excellent for breakfast sandwiches or as burger buns.
Blueberry Bagels
Fold in ½ cup fresh or frozen blueberries after kneading; add 1 teaspoon vanilla extract to wet ingredients. Lightly sweet with fruit bursts — amazing with cream cheese or mascarpone.
Asiago Herb Bagels
Add ½ cup shredded Asiago cheese + 1 tablespoon Italian seasoning; brush with garlic butter after baking. Rich, aromatic Italian flavours — perfect alongside soups or salads.
Chocolate Chip Bagels
Mix in ½ cup sugar-free chocolate chips; increase powdered sweetener to ⅓ cup. A dessert-style breakfast treat — serve with chocolate cream cheese.
By the Numbers
Nutrition Facts
⚠️ These nutritional values are provided as guidance only. Please calculate your own values based on the specific brands and products you use, as nutritional information can vary significantly between brands and even between countries selling the same brands.
Per Bagel (recipe makes 12)
Calories: 131.2 kcal •
Total Carbs: 3.93g •
Fiber: 1.59g •
Net Carbs: 2.34g •
Protein: 12.38g •
Fat: 7.12g •
Sugar: <1g •
Cholesterol: ~70mg •
Sodium: 125mg
Note: Values may vary depending on milk choice (Fairlife vs. almond milk) and specific ingredient brands used. Using Fairlife 4% (whole) milk adds approximately 1.25 kcal and 0.073g fat per bagel.
Why These Macros Fit a Flexible Keto Lifestyle
- High protein-to-carb ratio may support satiety for hours without blood sugar spikes
- Moderate healthy fats from eggs, cream cheese, and butter provide sustained energy
- Minimal net carbs (2.34g) fit easily into most flexible keto meal plans while delivering an authentic bagel experience
- Compare to traditional bagels with 50–60g net carbs — that’s 96% fewer carbs without sacrificing taste or texture
Serving Ideas
How Should You Serve These Bagels?
Classic Breakfast Pairings
- Toasted with cream cheese and smoked salmon
- Butter and sugar-free jam
- Almond butter and sliced strawberries
Hearty Breakfast Options
- Breakfast sandwich with fried egg, bacon, and cheddar
- Scrambled eggs with avocado and hot sauce
- Sausage patty and melted Swiss cheese
Elegant Brunch & Special Occasion
- Whipped herb cream cheese with cucumber and dill
- Smoked trout with capers and red onion
- Mascarpone with fresh berries and mint
Lunch & Dinner Ideas
- Turkey club with lettuce, tomato, and mayo
- Pulled pork with coleslaw
- Burger buns for flexible keto hamburgers
- Pizza bagels with marinara and mozzarella
Keeping It Fresh
How Do You Store These Bagels?
Room Temperature Storage
Store in an airtight container for up to 2 days at room temperature. Avoid plastic bags — they trap moisture and create a soggy texture.
Refrigerator Storage
Wrap individually in plastic wrap or store in an airtight container for up to 1 week. Toast directly from the refrigerator for best texture and flavour.
Freezer Storage
Wrap each bagel individually in plastic wrap, then place all in a freezer bag for up to 3 months. Thaw overnight in the refrigerator or microwave for 30–45 seconds on defrost setting. For batch prep, slice bagels before freezing so you can toast directly from frozen.
Pro Tip: Freeze half the batch immediately after cooling to maintain peak freshness — these bagels taste just-baked even after 3 months in the freezer.
Setting Expectations
Why Is Your First Bake a Practice Bake?
Your oven temperature accuracy, ingredient brands, and personal taste preferences all affect the final result. Think of your first batch as calibration, not failure.
Oven Variations
Even at the same temperature setting, ovens can run 25°F hotter or cooler depending on brand and age. Your bagels might need 23 minutes instead of 28, or vice versa.
Ingredient Brand Differences
One brand of vital wheat gluten may absorb more moisture than another. Fairlife milk creates a different texture than almond milk. These small variations require minor adjustments.
Personal Palate Adjustments
Non-tasters (roughly 25% of the population) may prefer extra salt or stronger seasonings. Medium tasters (roughly 50%) will likely enjoy the recipe as written. Super-tasters (roughly 25%) might find flavours intense and prefer reducing salt or sweetener.
Your first bake teaches you how YOUR oven, YOUR ingredients, and YOUR taste buds interact with this recipe. Take notes. Adjust. The second batch will be even better. Don’t get discouraged if the first attempt isn’t perfect — every baker needs to calibrate recipes to their unique kitchen. That’s not failure, it’s part of mastering flexible keto baking.
Master chewy, golden keto bagels using sourdough discard and vital wheat gluten. Perfect low-carb breakfast in under 2 hours with 2.3 g net carbs and 12.38g protein per serving.
- Prep Time: 2.5 hours
- Cook Time: 25 to 30
- Total Time: 3 hours
- Yield: 12 Bagels
- Category: Discard Recipes
- Method: Baking
- Cuisine: Keto Sourdough Discard
- Diet: Diabetic
Ingredients
Wet Ingredients
- 1 cup (plus more if needed) Fairlife Skim or 3% Milk, warmed (480 mL) (or almond or coconut milk)*
- 1 tablespoon instant yeast (10–11 g)
- 1 teaspoon sugar (4 g)
- 3 large eggs
- 1 cup Biome Boss™ Living Starter (240 g)
- ¼ cup unsalted butter, softened (57 g)
- ¼ cup cream cheese, softened (60 g)
*Always start with 1 cup and then add ore if needed. The amount of milk required will depend on the moisture of your discard.
Dry Ingredients
- 1 cup almond flour + 2 tablespoons coconut flour, sifted together (110 g + 16 g)
- 2 cups + 2 tablespoons vital wheat gluten (250 g)
- 3 tablespoons whole psyllium husks
- 1 tablespoon double acting baking powder (12 g)
- 1 teaspoon healthy salt (6 g)
Egg Wash
- 1 egg yolk
- 2 tablespoons Fairlife Skim Or 4% Milk (30 mL)
Instructions
- Combine Milk, Yeast, and Sugar: Pour 1 cup of warm Fairlife Skim milk into stand mixer bowl. Add instant yeast and sugar, stirring briefly to dissolve.
- Add Eggs and Remaining Wet Ingredients: Add 4 eggs and mix lightly. Then add Biome Boss™ Living Starter, butter softened and softened cream cheese.
- Mix on low speed for 10-15 seconds just until loosely combined.
- Add Dry Ingredients: Sift almond flour and coconut flour together. Add vital wheat gluten, the sifted almond-coconut flour mixture, whole psyllium husks, baking powder, salt, and powdered Swerve on top of wet ingredients. Mix on low speed with beater attachment for about 2 minute until a shaggy dough forms.
- Check the moisture of the dough. If it is too dry add more milk 1 tbsp at a time until the dough is sticky, but holds together. It needs to be dough, not “batter.”
- Rest (Autolyse): Cover bowl with t-towel and let rest for exactly 30 minutes at room temperature. The vital wheat gluten will tighten, psyllium will form a gel, and the dough will become firmer and smoother.
- Knead: Knead on medium-low speed for about 5 minutes. If the dough is too wet, add 1 to 2 tablespoons whole psyllium husks. Mix into the dough. Remove the bowl and let sit in the refrigerator to stiffen for about 15 minutes. If dough is too dry add 1 tablespoon milk at a time to moisten the dough so it pulls together. Knead for about 8 minutes until dough becomes smooth, elastic, and slightly tacky (not sticky).
- Perform the windowpane test—stretch a small piece of dough; it should form a thin, translucent membrane without tearing. If too soft, add 1 tablespoon psyllium again. If too firm, add 1–2 teaspoons warm milk.
- Shape: Divide dough into 2 equal portions (use a kitchen scale for precision). Roll each portion into a tight ball by tucking edges underneath and rolling in circular motions. Divide each portion into 6 balls. Stretch and fold each ball of dough at least 4 or 5 times to create tension on the top of the dough. Flatten the ball on the word surface into a disk. Using your thumb, push through the center to create a bagel hole. Mold the dough with your hands to ensure the dough is the same width throughout the whole bag. Repeat for all 12 pieces.
- Set each dough bagel on a cookie sheet lined with parchment.
- Second Proof: Proof for 60 to–80 minutes until dough expands.
- Bake: Preheat oven to 350°F (180°C) while dough finishes proofing. Brush tops with egg wash for that signature golden sheen. And sprinkle with favourite seasonings.
- Bake for 25 to 30 minutes until tops are light golden internal temperature reads 190–200°F (90–94°C). Tent with foil if browning too quickly after 20 minutes.
- Turn off the oven and leave the bagels in the oven for 5 to 10 minutes. This keeps them from deflating too much.
- Cool Completely: Remove bagels from the oven. Cool on cookie sheet for 10 minutes to set the structure. Transfer to wire rack and cool completely for 2 hours before slicing—this prevents gummy texture.
Notes
NUTRITIONAL VALUES:
Note: All nutritional values shown are estimates only. Actual values may vary based on ingredient brands, product formulations, measuring methods, and nutritional standards in different countries. The totals will also change if ingredients are substituted—especially if Fairlife milk is replaced with almond milk, coconut milk, or any other alternative. So be sure to do your own calculations.
✅ Full Recipe — Base Values (Using Fairlife Skim)
- Calories: 3,149.6 kcal
- Fat: 170.9 g
- Total Carbs: 94.32 g
- Fiber: 38.10 g
- Net Carbs: 56.22 g
- Protein: 297.23 g
- Sodium: 3,000 mg
✅ Change If Using Fairlife 4% (Whole)
- Calories: +30 kcal total
- Fat: +3.5 g total
(Carbs, fiber, net carbs, protein, sodium stay the same.)
✅ Per Bagel (Using Skim)
- Calories: 131.2 kcal
- Fat: 7.12 g
- Total Carbs: 3.93 g
- Fiber: 1.59 g
- Net Carbs: 2.34 g
- Protein: 12.38 g
- Sodium: 125 mg
✅ Change If Using Fairlife 4% (Whole)
- Calories: +1.25 kcal per slice
- Fat: +0.073 g per slice
Responses