
KETO SOURDOUGH BRIOCHE BAGELS

The Keto Baking Mechanic™ — Recipe
Keto Sourdough Brioche Bagels
Where We Create, Tweak and Enhance
Keto and Low Carb Breads and Baked Goods
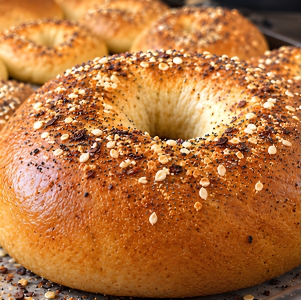
🥐 Full Deli-Size Shape, Brioche-Light Crumb, 2.23g Net Carbs per Serving
This is a new style of Keto sourdough bagel that combines the bagel shape and size, but with a light, pillowy, Brioche-style crumb on the inside. That combination — real size and real softness at the same time — is what vital wheat gluten makes possible, and it’s the whole idea behind this recipe.
A Note on Keto Labelling
Sinless Sourdough™ and The Keto Baking Mechanic™ use a flexible keto approach rather than strict keto. Our focus is low net carbs, high protein, and real texture — not zero-carb purity. If you follow strict keto, check the macros below against your own targets.
A traditional deli bagel of this size runs 50g or more in carbs — before you even add a topping. This one gives you the full shape and the satisfying chew of the real thing at 4.46g net carbs per bagel — just 2.23g per serving (half a bagel), because the dough leans on vital wheat gluten, almond flour, and a Brioche-style enrichment instead of refined wheat flour.
🎥 Follow The Keto Baking Mechanic on YouTube for more flexible keto recipes: @theketobakingmechanic
https://sinlesssourdough.com/shop/
Why This Recipe Works
Full deli-size shape — this is a real, substantial bagel, not a scaled-down keto version shrunk to make the texture easier to manage.
Brioche-light crumb — pillowy and airy on the inside, despite the big shape, thanks to a milk-bread style enrichment of eggs, cream cheese, butter, and milk.
Real chew on the outside
Over 80% fewer carbs than a traditional deli bagel of the same size.
What Makes These Brioche Bagels Different?
Most keto bagel recipes solve the structure problem by going small and dense — a flattened, heavy puck that holds together because there isn’t much of it to hold. This recipe solves it a different way: it builds enough real structure into the dough that it can afford to be big and light at the same time.
Key Differences
✓ Real, full-size bagel shape — not a mini or flattened version
✓ Brioche-light, airy crumb — not dense, rubbery, or cheese-paste-like
✓ A true bagel sheen
✓ Yields 12 large bagels (24 servings) per batch — sized to actually satisfy
Why Does This Recipe Work?
Vital Wheat Gluten Builds the Shape: Vital wheat gluten is pure gluten protein. It’s what makes a large, substantial bagel possible at all in keto baking — it gives the dough enough stretch and strength to hold a big ring shape through proofing and baking without collapsing or going dense in the centre.
Brioche-Light Texture: The milk-bread enrichment technique — eggs, cream cheese, butter, and milk worked into the dough — is what keeps a full-size bagel soft and airy on the inside instead of dense. Without it, a bagel this big in keto baking usually turns gummy or heavy.
Sourdough Fermentation: The Biome Boss™ Living Starter adds tang and helps develop the dough’s structure during the rise, the same way it would in traditional sourdough baking.
Qualities of the Main Ingredients
Vital Wheat Gluten
This is the backbone of the recipe — roughly 75–80% pure protein by weight. It’s what gives this dough enough strength to hold a full, large bagel shape through shaping, proofing, and baking without collapsing or going dense in the centre.
Almond Flour and Coconut Flour
Sifted together, these soften the crumb so the bagel doesn’t eat like pure gluten. Coconut flour is very absorbent, which is one reason the milk amount can vary from batch to batch.
Biome Boss™ Living Starter
Your living sourdough starter or discard adds tang and supports fermentation. Its moisture level varies, so it directly affects how much milk the dough needs — always start with 1 cup of milk and add more only if needed.
Whole Psyllium Husks
Whole psyllium husks (not powder) absorb moisture and form a gel that binds the crumb together, which matters even more in a larger bagel — it helps keep the centre from crumbling once you’ve got more dough to support.
Ingredients
Wet Ingredients
- 1 cup Fairlife 2% milk, warmed (240 mL), plus more if needed (or almond or coconut milk)*
- 1 tbsp instant yeast (10–11 g)
- 1 tsp sugar (4 g)
- 3 large eggs
- 1 cup Biome Boss™ Living Starter (240 g)
- ¼ cup unsalted butter, softened (57 g)
- ¼ cup cream cheese, softened (60 g)
*Always start with 1 cup of milk, then add more only if needed. The amount required depends on the moisture of your discard.
Dry Ingredients
- 1 cup almond flour + 2 tbsp coconut flour, sifted together (110 g + 16 g)
- 2 cups + 2 tbsp vital wheat gluten (250 g)
- 3 tbsp whole psyllium husks
- 1 tbsp double-acting baking powder (12 g)
- 1 tsp healthy salt (6 g)
- 2 tsp xanthan gum (optional and not mentioned in the video) — keeps the bagels from deflating
Egg Wash
- 1 egg yolk
- 2 tbsp Fairlife 2% milk (30 mL)
Equipment
- Stand mixer with beater attachment (strongly recommended — this dough is stiff)
- Kitchen scale (for dividing the dough evenly)
- Sifter or fine-mesh sieve
- Tea towel
- Cookie sheet lined with parchment
- Instant-read thermometer
- Aluminum foil (for tenting)
- Wire cooling rack
How Do You Make Perfect Keto Brioche Bagels?
Phase 1: Combine Milk, Yeast, and Sugar
Pour 1 cup of warm Fairlife 2% milk into the stand mixer bowl. Add the instant yeast and sugar, stirring briefly to dissolve.
Phase 2: Add the Remaining Wet Ingredients
Add the eggs and mix lightly. Then add the Biome Boss™ Living Starter, softened butter, and softened cream cheese. Mix on low speed for 10–15 seconds, just until loosely combined.
Phase 3: Add the Dry Ingredients and Check Moisture
Sift the almond flour and coconut flour together. Add the vital wheat gluten, the sifted almond-coconut flour mixture, whole psyllium husks, baking powder, salt, and xanthan gum (if using) on top of the wet ingredients. Mix on low speed with the beater attachment for about 2 minutes, until a shaggy dough forms.
Check the moisture of the dough. If it’s too dry, add more milk 1 tbsp at a time until the dough is sticky but holds together. It needs to be dough, not batter.
Phase 4: Rest (Autolyse)
Cover the bowl with a tea towel and let it rest for exactly 30 minutes at room temperature. The vital wheat gluten will tighten, the psyllium will form a gel, and the dough will become firmer and smoother.
Phase 5: Knead / Windowpane Test
Knead on medium-low speed for about 5 minutes. If the dough is too wet, mix in 1–2 tbsp whole psyllium husks, then remove the bowl and let the dough stiffen in the refrigerator for about 15 minutes. If it’s too dry, add milk 1 tbsp at a time until the dough pulls together. Knead for about 8 minutes more, until the dough is smooth, elastic, and slightly tacky (not sticky).
Perform the windowpane test: stretch a small piece of dough — it should form a thin, translucent membrane without tearing. If it’s too soft, add another 1 tbsp psyllium. If it’s too firm, add 1–2 tsp warm milk.
Phase 6: Shape the Bagels
Divide the dough into 2 equal portions (use a kitchen scale for precision). Roll each portion into a tight ball by tucking the edges underneath and rolling in circular motions. Divide each portion into 6 balls, for 12 in total.
Stretch and fold each ball at least 4 or 5 times to create tension on top of the dough. Flatten the ball on your work surface into a disk, then push your thumb through the centre to create the bagel hole. Mould the dough with your hands so the ring is the same width all the way around. Repeat for all 12 pieces and set each bagel on the parchment-lined cookie sheet.
Phase 7: Second Proof
Proof for 30 to 60 minutes, until the dough expands. Preheat the oven to 350°F (180°C) while the dough finishes proofing.
Phase 8: Glaze and Bake
Brush the tops with egg wash for that signature golden sheen, and sprinkle with your favourite seasonings.
Bake for 25 to 30 minutes, until the tops are light golden and the internal temperature reads 190–200°F (90–94°C). Tent with foil if they’re browning too quickly after 20 minutes — watch closely, as they brown quickly.
Turn off the oven and leave the bagels inside for 5 to 10 minutes. This keeps them from deflating too much.
Phase 9: Cool Completely
Remove the bagels from the oven and cool them on the cookie sheet for 10 minutes to set the structure. Transfer to a wire rack and cool completely for 2 hours before slicing — this prevents a gummy texture.
Troubleshooting
Problem: Dense or gummy centre
Solution: Confirm the internal temperature reaches 190–200°F before pulling the bagels out, and let them cool completely — the full 2 hours — before slicing.
Why it happens: A bigger bagel holds more moisture in the centre, and the crumb keeps setting as it cools.
Problem: Tops browning too fast
Solution: Tent loosely with foil after about 20 minutes and finish baking to temperature.
Why it happens: The egg yolk wash and the enriched dough brown quickly, often before the centre has fully set.
Problem: Bagels deflate after baking
Solution: Turn the oven off and leave the bagels inside for 5–10 minutes before removing them. Adding the optional xanthan gum also helps.
Why it happens: A sudden temperature drop can collapse the structure before it has fully set.
Problem: Hole closes up during baking
Solution: Make the thumb hole a little larger than you think you need, and mould the ring to an even width all the way around.
Why it happens: A bigger bagel has more dough pulling inward as it proofs and bakes, so the hole shrinks more than it would on a smaller one.
Problem: Dough too sticky to shape
Solution: Mix in 1–2 tbsp whole psyllium husks and refrigerate the dough for about 15 minutes to stiffen before kneading again.
Why it happens: Starter moisture varies, and psyllium needs time to absorb liquid — the dough firms up noticeably as it rests and chills.
Variations
- Everything Bagel: Top with everything bagel seasoning before baking
- Cinnamon Raisin: Add 1 tsp cinnamon to the dry mix and fold in 2 tbsp chopped raisins
- Jalapeño Cheddar: Fold in ½ cup shredded sharp cheddar and 1 diced jalapeño
- Blueberry: Fold in ⅓ cup fresh blueberries (adjust bake time slightly for extra moisture)
- Asiago Herb: Top with grated asiago and dried Italian herbs before baking
- Chocolate Chip: Fold in ⅓ cup sugar-free chocolate chips
Variations add their own carbs and calories — the nutrition facts below are for the plain bagel.
Nutrition Facts
Per Serving (½ bagel, using Fairlife 2%)
127 kcal · 3.76g total carbs · 1.54g fibre · 2.23g net carbs · 11.83g protein · 7.05g fat
Per Bagel (makes 12 large bagels)
254 kcal · 7.53g total carbs · 3.07g fibre · 4.46g net carbs · 23.66g protein · 14.11g fat
Whole Recipe (using Fairlife 2%)
3,051 kcal · 90.35g total carbs · 36.85g fibre · 53.5g net carbs · 283.9g protein · 169.27g fat
What We Count — and Why
The teaspoon of sugar in this recipe isn’t there for sweetness — it’s food for the yeast. The yeast consumes it during the rise, converting it into the gas that lifts the dough, so it isn’t counted in the carb totals. The instant yeast, baking powder, and xanthan gum are used in such small amounts that they add effectively zero net carbs, so they aren’t counted either. Salt contains no carbs.
Note: all nutritional values are estimates only. Actual values vary with ingredient brands, product formulations, measuring methods, and nutritional standards in different countries. Using Fairlife Skim instead of 2% saves about 49 kcal and 4.7g fat for the whole recipe; Fairlife 3.25% whole milk adds about 38 kcal and 3.6g fat. Carbs and net carbs stay the same. Replacing Fairlife with almond, coconut, or another milk will change the totals, so recalculate using your own ingredients. If you shape the dough into fewer, larger bagels, the per-bagel numbers will be higher.
Why these macros fit a flexible keto lifestyle: a high protein-to-carb ratio, meaningful fibre, and a net carb count low enough to fit most daily targets even at this full, satisfying size.
Serving Ideas
- Classic deli-style: cream cheese, smoked salmon, red onion, capers
- Breakfast sandwich: fried egg, cheddar, bacon
- Toasted and buttered: simple, warm, and satisfying on its own
- Open-faced melt: turkey, swiss, and a quick broil
Storage
Room Temperature: Up to 2 days in an airtight container.
Fridge: Up to 1 week, well wrapped.
Freezer: Up to 3 months. Slice before freezing so you can toast individual halves straight from frozen.
Why Is Your First Bake a Practice Bake?
Oven Variations: Every oven runs a little hot or cool. A large bagel needs even heat all the way through, so your first batch tells you whether your oven needs a few extra minutes or earlier tenting with foil.
Ingredient Brand Differences: Vital wheat gluten, coconut flour, and psyllium husks absorb liquid differently between brands, and starter moisture varies too. Your first bake shows you whether your dough needs a touch more or less milk next time.
Personal Palate Adjustments: Some bakers want more tang (let the starter ferment longer), some want it milder (use a freshly fed starter). Adjust to taste on your second batch.
Disclaimer: All information provided regarding the health benefits of flexible keto breads and baked goods is intended for educational purposes only. The content presented is not meant to be taken as specific medical advice.
Master chewy, golden keto bagels using sourdough discard and vital wheat gluten. Perfect low-carb breakfast in under 2 hours with 2.3 g net carbs and 12.38g protein per serving.
- Prep Time: 2.5 hours
- Cook Time: 25 to 30
- Total Time: 3 hours
- Yield: 12 Bagels
- Category: Discard Recipes
- Method: Baking
- Cuisine: Keto Sourdough Discard
- Diet: Diabetic
Ingredients
- Wet Ingredients
- 1 cup (plus more if needed) Fairlife Skim or 3% Milk, warmed (480 mL) (or almond or coconut milk)*
- 1 tablespoon instant yeast (10–11 g)
- 1 teaspoon sugar (4 g)
- 3 large eggs
- 1 cup Biome Boss™ Living Starter (240 g)
- ¼ cup unsalted butter, softened (57 g)
- ¼ cup cream cheese, softened (60 g)
- *Always start with 1 cup and then add ore if needed. The amount of milk required will depend on the moisture of your discard.
- Dry Ingredients
- 1 cup almond flour + 2 tablespoons coconut flour, sifted together (110 g + 16 g)
- 2 cups + 2 tablespoons vital wheat gluten (250 g)
- 3 tablespoons whole psyllium husks
- 1 tablespoon double acting baking powder (12 g)
- 1 teaspoon healthy salt (6 g)
- Egg Wash
- 1 egg yolk
- 2 tablespoons Fairlife Skim Or 4% Milk (30 mL)
- 2 tsp xanthan gum (optional and not mentioned in the video. Keeps bagels from deflating)
Instructions
- Combine Milk, Yeast, and Sugar: Pour 1 cup of warm Fairlife Skim milk into stand mixer bowl. Add instant yeast and sugar, stirring briefly to dissolve.
- Add Eggs and Remaining Wet Ingredients: Add 4 eggs and mix lightly. Then add Biome Boss™ Living Starter, butter softened and softened cream cheese.
- Mix on low speed for 10-15 seconds just until loosely combined.
- Add Dry Ingredients: Sift almond flour and coconut flour together. Add vital wheat gluten, the sifted almond-coconut flour mixture, whole psyllium husks, baking powder, salt, and powdered Swerve on top of wet ingredients. Mix on low speed with beater attachment for about 2 minute until a shaggy dough forms.
- Check the moisture of the dough. If it is too dry add more milk 1 tbsp at a time until the dough is sticky, but holds together. It needs to be dough, not “batter.”
- Rest (Autolyse): Cover bowl with t-towel and let rest for exactly 30 minutes at room temperature. The vital wheat gluten will tighten, psyllium will form a gel, and the dough will become firmer and smoother.
- Knead: Knead on medium-low speed for about 5 minutes. If the dough is too wet, add 1 to 2 tablespoons whole psyllium husks. Mix into the dough. Remove the bowl and let sit in the refrigerator to stiffen for about 15 minutes. If dough is too dry add 1 tablespoon milk at a time to moisten the dough so it pulls together. Knead for about 8 minutes until dough becomes smooth, elastic, and slightly tacky (not sticky).
- Perform the windowpane test—stretch a small piece of dough; it should form a thin, translucent membrane without tearing. If too soft, add 1 tablespoon psyllium again. If too firm, add 1–2 teaspoons warm milk.
- Shape: Divide dough into 2 equal portions (use a kitchen scale for precision). Roll each portion into a tight ball by tucking edges underneath and rolling in circular motions. Divide each portion into 6 balls. Stretch and fold each ball of dough at least 4 or 5 times to create tension on the top of the dough. Flatten the ball on the word surface into a disk. Using your thumb, push through the center to create a bagel hole. Mold the dough with your hands to ensure the dough is the same width throughout the whole bag. Repeat for all 12 pieces.
- Set each dough bagel on a cookie sheet lined with parchment.
- Second Proof: Proof for 30 to 60 minutes until dough expands.
- Bake: Preheat oven to 350°F (180°C) while dough finishes proofing. Brush tops with egg wash for that signature golden sheen. And sprinkle with favourite seasonings.
- Bake for 25 to 30 minutes until tops are light golden internal temperature reads 190–200°F (90–94°C). Tent with foil if browning too quickly after 20 minutes. Watch closely as they brown quickly.
- Turn off the oven and leave the bagels in the oven for 5 to 10 minutes. This keeps them from deflating too much.
- Cool Completely: Remove bagels from the oven. Cool on cookie sheet for 10 minutes to set the structure. Transfer to wire rack and cool completely for 2 hours before slicing—this prevents gummy texture.
Master chewy, golden keto bagels using sourdough discard and vital wheat gluten. Perfect low-carb breakfast in under 2 hours with 2.3 g net carbs and 12.38g protein per serving.
- Prep Time: 2.5 hours
- Cook Time: 25 to 30
- Total Time: 3 hours
- Yield: 12 Bagels
- Category: Discard Recipes
- Method: Baking
- Cuisine: Keto Sourdough Discard
- Diet: Diabetic
Ingredients
- Wet Ingredients
- 1 cup (plus more if needed) Fairlife Skim or 3% Milk, warmed (480 mL) (or almond or coconut milk)*
- 1 tablespoon instant yeast (10–11 g)
- 1 teaspoon sugar (4 g)
- 3 large eggs
- 1 cup Biome Boss™ Living Starter (240 g)
- ¼ cup unsalted butter, softened (57 g)
- ¼ cup cream cheese, softened (60 g)
- *Always start with 1 cup and then add ore if needed. The amount of milk required will depend on the moisture of your discard.
- Dry Ingredients
- 1 cup almond flour + 2 tablespoons coconut flour, sifted together (110 g + 16 g)
- 2 cups + 2 tablespoons vital wheat gluten (250 g)
- 3 tablespoons whole psyllium husks
- 1 tablespoon double acting baking powder (12 g)
- 1 teaspoon healthy salt (6 g)
- Egg Wash
- 1 egg yolk
- 2 tablespoons Fairlife Skim Or 4% Milk (30 mL)
- 2 tsp xanthan gum (optional and not mentioned in the video. Keeps bagels from deflating)
Instructions
- Combine Milk, Yeast, and Sugar: Pour 1 cup of warm Fairlife Skim milk into stand mixer bowl. Add instant yeast and sugar, stirring briefly to dissolve.
- Add Eggs and Remaining Wet Ingredients: Add 4 eggs and mix lightly. Then add Biome Boss™ Living Starter, butter softened and softened cream cheese.
- Mix on low speed for 10-15 seconds just until loosely combined.
- Add Dry Ingredients: Sift almond flour and coconut flour together. Add vital wheat gluten, the sifted almond-coconut flour mixture, whole psyllium husks, baking powder, salt, and powdered Swerve on top of wet ingredients. Mix on low speed with beater attachment for about 2 minute until a shaggy dough forms.
- Check the moisture of the dough. If it is too dry add more milk 1 tbsp at a time until the dough is sticky, but holds together. It needs to be dough, not “batter.”
- Rest (Autolyse): Cover bowl with t-towel and let rest for exactly 30 minutes at room temperature. The vital wheat gluten will tighten, psyllium will form a gel, and the dough will become firmer and smoother.
- Knead: Knead on medium-low speed for about 5 minutes. If the dough is too wet, add 1 to 2 tablespoons whole psyllium husks. Mix into the dough. Remove the bowl and let sit in the refrigerator to stiffen for about 15 minutes. If dough is too dry add 1 tablespoon milk at a time to moisten the dough so it pulls together. Knead for about 8 minutes until dough becomes smooth, elastic, and slightly tacky (not sticky).
- Perform the windowpane test—stretch a small piece of dough; it should form a thin, translucent membrane without tearing. If too soft, add 1 tablespoon psyllium again. If too firm, add 1–2 teaspoons warm milk.
- Shape: Divide dough into 2 equal portions (use a kitchen scale for precision). Roll each portion into a tight ball by tucking edges underneath and rolling in circular motions. Divide each portion into 6 balls. Stretch and fold each ball of dough at least 4 or 5 times to create tension on the top of the dough. Flatten the ball on the word surface into a disk. Using your thumb, push through the center to create a bagel hole. Mold the dough with your hands to ensure the dough is the same width throughout the whole bag. Repeat for all 12 pieces.
- Set each dough bagel on a cookie sheet lined with parchment.
- Second Proof: Proof for 30 to 60 minutes until dough expands.
- Bake: Preheat oven to 350°F (180°C) while dough finishes proofing. Brush tops with egg wash for that signature golden sheen. And sprinkle with favourite seasonings.
- Bake for 25 to 30 minutes until tops are light golden internal temperature reads 190–200°F (90–94°C). Tent with foil if browning too quickly after 20 minutes. Watch closely as they brown quickly.
- Turn off the oven and leave the bagels in the oven for 5 to 10 minutes. This keeps them from deflating too much.
- Cool Completely: Remove bagels from the oven. Cool on cookie sheet for 10 minutes to set the structure. Transfer to wire rack and cool completely for 2 hours before slicing—this prevents gummy texture.

Responses